

In Case of Emergency: Radical Solutions to Save Your Houseplant
If you've put in diligent effort and care to nurture your beloved houseplant, but despite your best attempts and common troubleshooting practices, it continues to show signs of distress, such as turning black, wilting stems, and dropping leaves, it might be time to explore unconventional plant survival strategies typically reserved for emergencies.
Radical gardening methods involve extreme approaches to tackle specific issues affecting houseplants and would not ordinarily be recommended. These methods should be viewed as last-resort measures, as they carry the risk of further stressing your plant and their success is not guaranteed. Here are some radical gardening methods that could be considered when all other solutions have proven ineffective in saving a rapidly declining houseplant:

Cut the plant back to the soil
In general, cutting a plant back to the soil can be a drastic measure. It's important to note that not all plants respond well to severe pruning, and success may vary depending on the plant species, its overall health, root condition, and the specific issues affecting it.
This method of care involves pruning the entire above-ground portion of a plant, leaving only the base or the stems near the soil level. Also known as a severe or hard prune, this method is typically employed when a plant is severely stressed, dying, or in a state of decline, and can be used as a last-resort effort to rejuvenate a struggling plant.
- When a plant is experiencing severe stress, whether due to diseases, pests, nutrient deficiencies, or environmental factors, cutting it back to the soil can remove the stressed and damaged growth, giving the plant a chance to redirect its resources toward new, healthy growth.
- Cutting the plant back to the soil can serve as a form of rejuvenation. By removing old and declining growth, the plant is encouraged to produce new shoots and foliage. This process may stimulate a burst of growth and improve the overall health of the plant.
- If a plant is plagued by persistent diseases or pests that affect the above-ground parts, cutting the plant back can help eliminate the source of the problem. It's crucial to properly dispose of the pruned material to prevent the spread of diseases or pests.
- In some cases, cutting back the above-ground growth allows the plant's energy to be redirected to the root system. This can be beneficial if the root system is relatively healthy, and the above-ground parts are suffering.
How to Cut the Plant Back to the Soil:
- Prepare Tools: Use sharp, clean pruning shears or loppers to make clean cuts. Sterilize the tools with rubbing alcohol or a disinfectant solution to prevent the spread of diseases.
- Assess the Plant: Evaluate the overall condition of the plant and identify areas of decline, damage, or stress. Focus on removing the affected parts.
- Make Clean Cuts: Trim the plant back to the soil level or leave a few inches of stem above the soil. Make the cuts just above a node or healthy bud to encourage new growth.
- Dispose of Pruned Material: Properly dispose of the pruned material, especially if the plant is affected by diseases or pests. Do not compost diseased material.
- Provide Care After Pruning: After pruning, give the plant appropriate care, including proper watering, fertilisation, and monitoring for any signs of recovery or new growth. The plant may need a bit of time to recover, so be attentive to its needs. It's important to be patient after pruning. The plant may look sparse initially, but new growth should emerge over time if this procedure is successful.
There are downsides to cutting a plant back to the soil. This may shock the plant and carry risks such as stress, uncertain recovery, infection, and environmental vulnerability which may mean the irreversible demise of your plant. Gradual pruning, proper tools, and post-pruning care can minimize these risks.
Several garden growing plants such as Roses and many Australian Natives are known for their resilience and ability to bounce back from severe pruning. While individual responses can vary, there is a higher risk when it comes to houseplants especially those that are still very young. Here are some houseplants that are generally more likely to survive and even thrive after such radical pruning:
- Philodendron (various varieties, e.g., heartleaf, pothos)
- Spider Plant (Chlorophytum comosum)
- Dieffenbachia (Dumb Cane)
- Dracaena (e.g., Dracaena marginata, corn plant)
- ZZ Plant (Zamioculcas zamiifolia)
- Snake Plant (Sansevieria)
- Aloe Vera
- Rubber Plant (Ficus elastica)
- Peace Lily (Spathiphyllum)
- Syngonium (Arrowhead Plant)

Repotting in Extreme Conditions
Only try this method if you have already tried repotting your plant with brand new soil mix and there has been no changed to the health of your plant. This is the practice of transplanting a struggling or dying houseplant into a completely different and often unconventional growing medium, or under extreme conditions, to address specific issues or stimulate the plant's recovery. This is often stressful for the plant and may not be suitable for species that are intolerant of changing growing conditions that are overly dry or wet, and severely lacks or exceeds ordinarily nutrient intake.
- If the plant is suffering from persistent soil-related problems such as compaction, poor drainage, or nutrient imbalances, repotting in an extreme growing medium (e.g., pure perlite, vermiculite, or a specialized mix) might be attempted to provide a clean slate for the plant.
- If the plant has experienced severe root damage or is affected by root diseases such as root rot, repotting in an entirely new growing medium may help remove the source of the problem and give the plant a chance to regenerate healthy roots.
- Converting the plant to a hydroponic system, where it grows without soil and receives nutrients directly in a water-based solution, can be considered an extreme form of repotting. This approach may be attempted if soil-related issues are a major concern.
- Repotting in combination to a change of environment with extreme conditions, such as a different light intensity, temperature range, or humidity level, might be experimented with to see if the plant responds positively to the new conditions.
- Attempting unconventional propagation methods during repotting, such as air layering or tissue culture, could be considered an extreme measure to create new plants from the struggling one.
These houseplants are generally known for their resilience and adaptability, making them more likely to survive and recover well after being repotted in extreme conditions. However, repotting should be done with care, ensuring that the new growing medium is appropriate for the plant's needs, and the plant is given time to acclimate to the changes.
- Snake Plant (Sansevieria)
- ZZ Plant (Zamioculcas zamiifolia)
- Spider Plant (Chlorophytum comosum)
- Peace Lily (Spathiphyllum)
- Aloe Vera
- Dracaena (e.g., Dracaena marginata)
- Philodendron (various varieties, including heartleaf and pothos)
- Rubber Plant (Ficus elastica)
- Monstera Deliciosa
- Succulents (various varieties, such as Echeveria and Haworthia)

Radical Changes in Environment
Like Repotting in Extreme Conditions, this method refers to making significant and abrupt alterations but in regards to the growing environment of a houseplant. This can involve adjustments in factors such as light intensity, temperature, humidity, or even the overall location of the plant. While this approach is considered radical, it should be approached with caution, as sudden changes can stress the plant.
- Increase or decrease the amount of light the plant receives. If the plant is not getting enough light, move it to a brighter location or supplement natural light with artificial grow lights. Conversely, if the plant is getting too much light, move it to a shadier or low light area.
- Adjust the temperature around the plant. Some plants may benefit from incremental and temporary increase or decrease in temperature. However, be cautious not to subject the plant to extreme fluctuating temperature changes, as this can cause stress.
- Change the humidity levels around the plant. Increase humidity by misting the plant or placing it on a tray filled with water and pebbles. Decrease humidity by moving the plant to a drier location.
- Modify the watering schedule. If the plant is suffering from overwatering, reduce the frequency of watering. If it's underwatered, increase watering. Be cautious not to swing too abruptly, as this can also shock the plant.
- Repot the plant into a different growing medium or change the soil composition. This can be useful if the current soil is compacted, lacks drainage, or is contributing to the plant's decline.
- Move the plant to a different room or area in your home. Factors such as air circulation, drafts, and overall environmental conditions can vary between locations.
- Mimic seasonal changes by altering factors such as temperature, light duration, and humidity. This may involve providing a period of "winter rest" or adjusting conditions to simulate a more favourable growing season.
It's essential to note that while radical changes in environment can be attempted as a last-resort measure, they should be done gradually to minimize stress on the plant. Once the environment is suitably different, give the plant time to adjust. Abrupt changes can lead to shock, and not all plants respond positively to extreme alterations.
Certain houseplants have adaptations that make them generally more resilient and tolerant to radical changes in their environment. These plants typically thrive in indirect, bright natural light with moderate indoor humidity and temperature levels.
- Spider Plant (Chlorophytum comosum)
- ZZ Plant (Zamioculcas zamiifolia)
- Snake Plant (Sansevieria)
- Cast Iron Plant (Aspidistra elatior)
- Succulents (Various varieties, e.g., Aloe vera, Echeveria)
- Philodendron (Various varieties, including heartleaf and pothos)
- Peace Lily (Spathiphyllum)
- Aloe Vera
- Pothos (Epipremnum aureum)
- Rubber Plant (Ficus elastica)

Grafting or Budding
Grafting and budding are horticultural techniques used to combine the desirable characteristics of two plants into a single plant. These methods involve joining a portion of one plant (known as the scion or bud) with another plant (the rootstock). While grafting and budding are more commonly used for purposes like propagating fruit trees, creating disease-resistant plants, or developing new plant varieties, they might be considered as a more advanced and radical measure to save a dying houseplant in certain situations.
- Grafting involves joining a scion from one plant onto the rootstock (the root system and lower part of the stem) of another plant. The scion and rootstock need to be compatible for a successful graft. Grafting allows for the combination of desired qualities from both plants.
- Budding is a specific type of grafting where a single bud, often with a small piece of bark and cambium layer, is inserted into a T-shaped incision in the bark of the rootstock. The bud grows into a shoot, and the rootstock provides the root system.
- If the houseplant is struggling or dying due to a specific issue, such as disease, poor growth, or a genetic predisposition, grafting or budding a scion with desirable traits onto a healthy rootstock might result in a more resilient and vigorous plant.
- Grafting or budding can be used to preserve the genetics of a rare or valuable plant. If the original plant is declining, the technique allows you to retain its genetic material and potentially propagate it onto a healthier rootstock.
- If the houseplant is affected by a soil-borne disease or pest, grafting onto a disease-resistant rootstock may provide a solution. This is a common practice in fruit tree cultivation to create trees resistant to specific diseases.
- Grafting or budding can be used as a rejuvenation technique. If a significant portion of the houseplant is struggling, grafting a healthy scion onto a suitable rootstock can promote new, vigorous growth.
Here's a basic guide for grafting and budding:
- Selecting Materials: Choose a healthy scion and a compatible rootstock. The diameter of the scion and rootstock should be similar for a successful graft.
- Prepare Scion: Cut a scion that includes several buds and a portion of the stem. Trim it to a wedge or other suitable shape for grafting.
- Prepare Rootstock: Make a clean, slanting cut on the rootstock. This cut is typically made at an angle to increase the surface area for the graft.
- Make the Graft: Place the scion onto the rootstock, aligning the cambium layers (the green layer just under the bark) as closely as possible. Secure the scion in place using grafting tape or rubber bands.
- Seal the Graft: Apply grafting wax or another suitable sealant to cover the graft union, protecting it from drying out and infection.
- Secure the Graft: Use additional wrapping material to secure the scion in place and ensure good contact between the scion and rootstock.
- Labelling: Label the grafted plant with the date, type of graft, and other relevant information.
- Care After Grafting: Place the grafted plant in a controlled environment with high humidity to encourage successful healing. Gradually reintroduce the plant to normal conditions once the graft has taken.
It's important to note that grafting and budding require some skill and knowledge and is generally left to more experienced gardeners. The success of these techniques depends on factors such as the compatibility of the scion and rootstock, timing, and proper care after the grafting process. Grafting introduces potential complications like incompatibility between the scion and rootstock, and the risk of bacteria and fungal disease transmission through the open cut. Additionally, not all plants are suitable for grafting or budding, and only suited to plants with cambium layers that easily unite.
Here are some woody stem houseplants that may be able to withstand grafting and budding:
- Ficus elastica (Rubber Plant)
- Ficus lyrata (Fiddle Leaf Fig)
- Dracaena spp. (Dragon Tree)
- Monstera deliciosa
- Philodendron spp.
- Schefflera arboricola (Umbrella Plant)

Soil Sterilisation
Soil sterilisation is a process used to eliminate or reduce the population of harmful organisms, such as pathogens, pests, and weed seeds, from soil. This technique is typically employed to create a clean and pathogen-free environment for plant growth if brand new potting soil is unavailable. While soil sterilisation can be beneficial in certain situations, it is not a method without potential drawbacks, and it is not always the easiest or mess free solution.
- If your houseplant is suffering from soil-borne diseases, such as root rot or fungal infections, soil sterilisation can help eliminate the pathogens responsible for the decline. This is particularly relevant if conventional treatments like replacing the soil have not been effective.
- Soil sterilisation can also eliminate weed seeds present in the soil. This is beneficial for preventing the growth of unwanted plants that might compete with your houseplant for resources.
- Some pests, such as nematodes, can live in the soil and damage plant roots. Soil sterilisation can reduce the population of harmful pests and provide a clean environment for the plant to recover.
- If the soil has become compacted, lacks proper drainage, or has other issues that are contributing to the decline of your houseplant, sterilising the soil and reintroducing a fresh, well-draining growing medium can help create a healthier environment for the plant.
here are different methods for soil sterilisation, including:
- Heat Treatment: This involves heating the soil to high temperatures to kill pathogens and pests. This can be done using steam or by baking the soil in an oven.
- Chemical Sterilization: Certain chemicals, such as methyl bromide, have been used for soil sterilisation. However, chemical methods are less common due to environmental concerns and potential harm to beneficial soil organisms.
- Solarization: This method involves covering the soil with clear plastic to trap solar heat and raise the temperature to levels that can kill pathogens, pests, and weed seeds.
Sterilising soil can eliminate beneficial microorganisms and disrupt the natural balance of the soil ecosystem. Additionally, it may not be suitable for all plant species, and extreme heat treatments can impact soil structure.
Houseplants that are more likely to benefit from soil sterilisation include those that are susceptible to root diseases, fungal infections, or pests and usually flourish in tropical or subtropical environments. Here are a few examples:
- Ferns (Various species)
- Orchids (Various species)
- Bromeliads (Various species)
- Carnivorous Plants (e.g., Venus Flytrap, Pitcher Plants)
- Sensitive Plants (Mimosa pudica)
- Certain Succulents (e.g., Lithops, Haworthia

Induce Dormancy
Dormancy is a period of slowed or suspended growth that some plants naturally go through in response to environmental conditions. Inducing dormancy in houseplants involves mimicking the environmental conditions that trigger a rest period in the plant's natural cycle. This method of care can be a strategy to help unhealthy plants recover as it forces them to conserve energy for basic well-being and maintenance.
- If a plant is experiencing stress due to overwatering, underwatering, or other factors, inducing dormancy can provide a period of rest. During dormancy, the plant's metabolic processes slow down, reducing its overall stress.
- Dormancy can act as a reset button for the plant's growth cycle. It allows the plant to pause and then resume growth under more favourable conditions. This can be particularly useful if the plant has been growing in suboptimal conditions or has experienced significant stress.
- If a plant is infested with pests or has a disease, inducing dormancy might be a way to disrupt the life cycle of pests or pathogens. During dormancy, the plant may shed leaves or go through other changes that can help in managing infestations.
- For certain plants that naturally go through a dormant period in winter, simulating winter conditions (reduced light, cooler temperatures, and less frequent watering) can encourage a healthy dormancy phase.
- During dormancy, the plant requires fewer resources, such as water and nutrients. This can be beneficial if the plant is struggling to take up nutrients from the soil or if the roots are damaged.
- If the roots of the plant are stressed or damaged, inducing dormancy can redirect energy towards root recovery. The plant can focus on repairing and regenerating its root system during this dormant phase.
Here's a general guide on how to induce dormancy in houseplants:
- Timing: Determine the appropriate time to induce dormancy based on the natural growth cycle of the plant. This is often during the winter months for species that naturally experience a rest period.
- Reduce Watering: Gradually reduce the frequency of watering as the plant enters the dormancy period. Allow the soil to dry out between waterings but be cautious not to let it become bone dry.
- Adjust Light Levels: Lower the light levels to simulate the reduced sunlight conditions that many plants experience during winter. Move the plant to a location with lower light intensity or reduce the duration of artificial lighting.
- Lower Temperature: If possible, provide cooler temperatures for the plant. This can involve moving the plant to a cooler room or adjusting the thermostat. Avoid exposing the plant to extreme cold or draughty spaces.
- Limit Fertilisation: Cease fertilisation during the dormancy period, as plants typically have reduced nutrient requirements when growth slows down. Resume fertilisation when the plant starts to show signs of coming out of dormancy.
- Shortened Day Length: For plants that respond to day length, such as certain bulbs or tuberous plants, reduce the number of hours of light the plant receives each day.
- Monitor Plant Health: Keep a close eye on the plant during the dormancy period. While reduced growth is expected, monitor for signs of stress, pests, or diseases.
- Gradual Transition: When the dormancy period is over, gradually transition the plant back to its normal growing conditions. Increase watering, adjust light levels, and resume fertilisation.
This is considered an extreme form of care as most indoor plants are tropical or subtropical and do not naturally experience dormancy periods. This is altering their normal growing cycle and potentially starving the plant of vital hydration, sunlight and nutrients. This method also actively prevents the plant from producing new growth in order to restore health to vital stems and roots resulting in a sparse appearance. There are some houseplants that are more likely to recover due to a simulated dormancy period. Keep in mind that abrupt changes in environmental conditions can stress plants, so any adjustments should be made gradually.
- Cacti (Various species)
- Succulents (Various species, e.g., Aloe vera, Haworthia, Echeveria)
- Christmas Cactus (Schlumbergera)
- Bulbous Plants (e.g., Amaryllis, Clivia)
- Certain Orchids (e.g., Phalaenopsis)
- Tropical Pitcher Plants (Nepenthes)

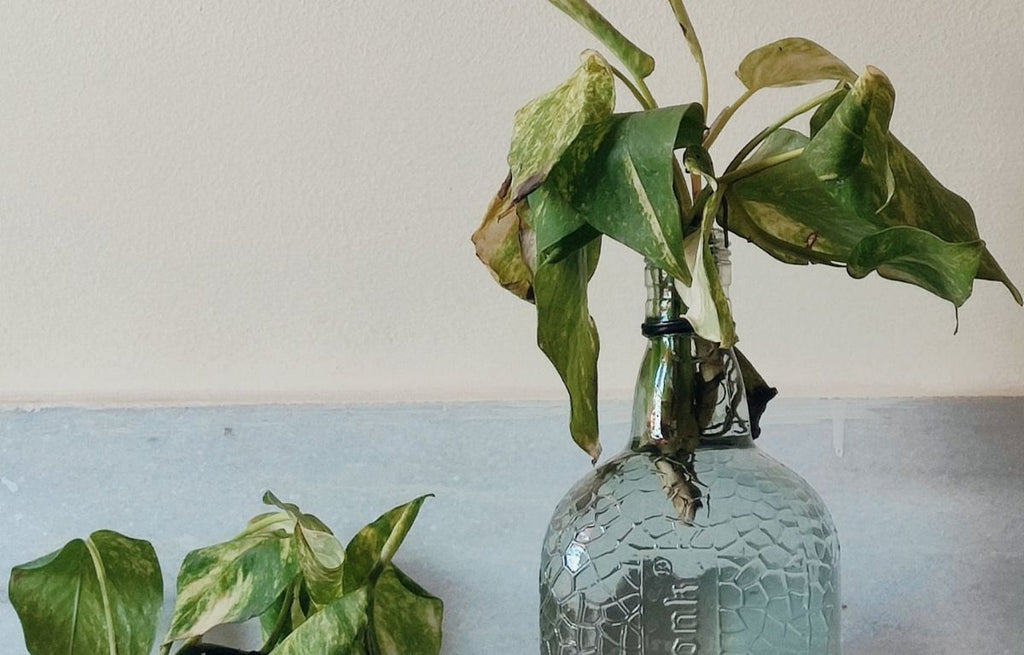
Water Therapy
Water therapy involves temporarily placing the plant's roots in water to address issues related to overwatering, root rot, or soil problems. The goal is to provide a controlled environment that promotes root recovery and helps the plant overcome stress. Water therapy is considered a radical method and should be used cautiously, and with plants that are tolerant of moist conditions. Definitely not a useful method for Cacti.
- If your plant is suffering from overwatering or has been growing in waterlogged soil, water therapy can help remove excess moisture and allow the roots to recover. Placing the plant in water allows the soil to dry out and helps prevent further damage to the roots.
- Water therapy can be effective in treating root rot, a condition caused by fungi that thrive in excessively wet conditions. By temporarily placing the plant in water, you can create an environment where the roots can recover and potentially regrow healthy tissue.
- In cases where the soil has become compacted and lacks proper aeration, water therapy can help by allowing the roots to take in oxygen directly from the water. This can be especially beneficial if the compacted soil is contributing to the plant's decline.
Here's a general guide on how to perform water therapy:
- Remove the Plant from Soil: Gently remove the plant from its pot, being careful not to damage the roots.
- Clean the Roots: Rinse the roots thoroughly to remove any soil or debris. Trim away any dead or rotting roots.
- Place in Clean Water: Place the plant in a container with clean, room-temperature water. The water level should be sufficient to submerge the roots but not the entire plant.
- Monitor and Change Water: Monitor the plant and change the water regularly, ideally every few days, to prevent the development of stagnant water that can lead to other issues.
- Observe for Signs of Recovery: After a period of water therapy, observe the plant for signs of recovery, such as the emergence of new, healthy roots or shoots.
These plants are generally more adaptable to short-term water immersion, but it's crucial to exercise caution and avoid prolonged submersion to prevent issues like root rot if they are not suited to growing in water.
- Lucky Bamboo (Dracaena sanderiana)
- Pothos (Epipremnum aureum)
- Peace Lily (Spathiphyllum)
- Arrowhead Plant (Syngonium podophyllum)
- Water Hyacinth (Eichhornia crassipes)
- Aquatic Plants (e.g., Water Lettuce, Water Sprite)
- Rubber Plant (Ficus elastica)
- Many varieties of Ferns including Asparagus Fern (Asparagus setaceus), Boston Fern (Nephrolepis exaltata), and Maidenhair Fern (Adiantum).

Hydroponics Conversion
Hydroponics conversion involves transitioning a plant from traditional soil-based growing to a hydroponic system. Hydroponics is a method of growing plants without soil, where nutrients are delivered directly to the plant roots through a nutrient-rich water solution. This growing method is very successful when growing garden vegetables, herbs and fruits. While hydroponics is not a common method for rescuing a dying houseplant, it can be considered in dire circumstances.
- In a hydroponic system, nutrients are directly delivered to the plant roots in a highly soluble form. This can enhance nutrient uptake, providing the plant with the essential elements it needs for growth more efficiently than traditional soil.
- Hydroponic systems allow for precise control over environmental factors such as pH, nutrient levels, and water availability. This control can create an optimal growing environment, which may be beneficial for a struggling plant.
- Hydroponics eliminates the use of soil, reducing the risk of soil-borne diseases and pests. If your houseplant is suffering from persistent soil-related issues, converting it to hydroponics can create a clean and disease-free environment.
- Hydroponic systems provide ample oxygen to the roots, promoting better aeration. If your plant is experiencing root-related problems, such as root rot or poor aeration in the soil, converting to hydroponics can give the roots a chance to recover.
- Hydroponic systems often result in faster growth rates compared to traditional soil-based growing. If your goal is to see rapid recovery and new growth, hydroponics may offer a solution.
How to convert a houseplant to hydroponics from potting soil:
- Remove the Plant from Soil: Gently remove the plant from its pot and shake off the soil from the roots.
- Rinse the Roots: Rinse the roots under clean water to remove any remaining soil particles.
- Choose a Hydroponic System: Select a suitable hydroponic system, such as a nutrient film technique (NFT), deep water culture (DWC), or a simple water culture system.
- Prepare the Nutrient Solution: Mix a balanced hydroponic nutrient solution according to the instructions. This solution will replace the nutrients that would typically come from soil.
- Place the Plant in the Hydroponic System: Insert the plant into the hydroponic system, ensuring that the roots are submerged in the nutrient solution.
- Monitor and Adjust: Monitor the plant closely and adjust nutrient levels, pH, and other environmental factors as needed. Hydroponic systems require careful attention to maintain optimal conditions.
It's important to note that success depends on various factors, including the specific needs of the plant and your ability to manage a hydroponic system. Additionally, not all plants are suitable for hydroponic growing, so research and careful consideration are essential before attempting this method. If you're uncertain, seek advice from experienced hydroponic growers or horticulturists.
While most houseplants are traditionally grown in soil, some may benefit from hydroponics conversion and its consistent moisture and nutrient delivery, especially if they are struggling in their current soil-based environment.
- Peace Lily (Spathiphyllum)
- Spider Plant (Chlorophytum comosum)
- Philodendron (Various varieties)
- Pothos (Epipremnum aureum)
- African Violet (Saintpaulia)
- Herbs (e.g., Basil, Mint)
- Lettuce and Leafy Greens
- Strawberry Plants

Propagation
Sadly, not all houseplants can be saved once they become ill. Propagating a dying plant might be a strategy to salvage a part of the plant and potentially revive it through new growth.
- If the plant holds sentimental value or is rare and difficult to find, propagating it allows you to preserve its genetic material and continue its existence in your garden or home.
- Even if the entire plant is struggling, there may be healthy sections, such as certain stems, leaves, or roots, that can be salvaged and used for propagation. By doing so, you can potentially create new, healthy plants.
- Propagating healthy parts of a dying plant provides an opportunity for rejuvenation. New growth from the propagated parts may be more vigorous and better adapted to the current conditions, helping the plant recover.
- Propagation allows you to create multiple plants from a single one. If you successfully propagate a dying plant, you can increase the number of individuals, providing backups or sharing them with others.
- Propagation involves various methods such as stem cuttings, leaf cuttings, division, and more. Trying different propagation techniques on a dying plant allows you to experiment and learn which methods work best for that particular species.
- Rather than losing the entire plant, salvaging healthy portions through propagation can mitigate the overall loss. If the main plant continues to struggle, the propagated parts may establish themselves as independent, healthier plants.
When propagating a dying plant, it's crucial to follow proper propagation techniques and create conditions conducive to root development or new growth. Not all plants respond well to propagation, so success may vary depending on the species and the overall health of the parent plant regardless of the part you remove for propagation.
Keep in mind that propagation should be seen as a potential solution but not a guaranteed one. If the plant is severely diseased or damaged, it may not be salvageable through propagation alone as the illness may have already spread.